
How To Use UTM Tracking
Ok let’s talk about how to use UTM tracking!
I see people running all sorts of ads, all the time – without any UTM tracking whatsoever.
Guys – you’re mad!
It takes seconds to add and especially since the last iOS14 Facebook ads update, you’re crazy if you aren’t using it.
Sales from Apple devices are now either not coming in at all (lol), or taking days/weeks to register in Facebook ads.
Therefore, it’s vital that you use UTM tracking so you can keep on top of where (which campaigns/ads) your sales are coming from.
Otherwise, how do you know which ads to keep running, or kill?
You could be wasting money on ads that aren’t bringing in sales, or even worse – killing off profitable ones.
By using UTM tracking, you will get a much clearer perspective of your Facebook ad campaigns and their performance..
What Is UTM Tracking?
UTM stands for Urchin Traffic Monitor.
UTM tracking is a snippet of simple code that you add to the end of your URL.
This will track the performance of campaigns, ads and content.
There are 5 variants of URL parameters you can track. (you don’t have to use all 5)
The variants are : source, medium, campaign, term and content
UTM tracking codes show up in your Google analytics report, making tracking marketing performance a breeze.
![]()
Let’s look at some example links using UTM tracking.
http://yourwebsite.com/blog-post/?utm_source=facebook
The text above in bold starting after ‘?’ is the UTM code.
This particular code would let you know any traffic from this link came from facebook.
http://yourshop.com/product-tite/?utm_source=google&utm_medium=paidad
The UTM code above would let you know any traffic from this link came from google, and the medium was a paid ad.
UTM values are specified by yourself and are completely customizable.
Now, if you want to learn more about the ins and outs of UTM tracking – please do google it.
There are literally thousands of pages going into microscopic detail, and I don’t need to write another one 🙂
This blog post is linked to a Shine-On / P.O.D Youtube, so I’m going to be covering how we do UTM tracking for this here.
Shopify First, Platform Later
Seeing as I run a Shopify store, I’m going to cover how to do UTM tracking for this first.
Luckily, it’s super easy.
One generic copy-paste line of text into your ads, and you’re good to go!
Here’s the text you need :
utm_source=Facebook&utm_medium=cpc&utm_campaign={{campaign.name}}&utm_content={{ad.name}}&utm_term={{adset.name}}
Might look a bit long I know, but this is all you need in Facebook ads and will work with every ad!
Go onto the ad level in Ads Manager, and paste the text in as indicated below into every ad that you run :
![]()
Adding the one simple string above to the URL parameters section of your Facebook ads will pull in all sorts of data into your Shopify orders.
This way you get a much better indication of which campaign, adset, and ad that your purchase(s) came from.
Trust me – without this code in place you are literally ‘running blind’ a lot of the time.
True, some purchases will show automatically in your ads manager.
But – a lot won’t.
And that number will be even less now with the iOS14 update that happened recently.
With UTM tracking in place, you can check each individual Shopify order and see exactly where it came from.
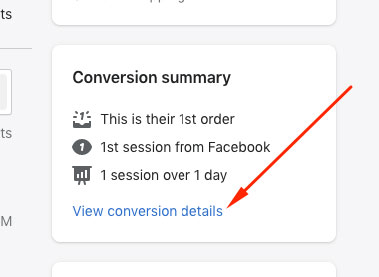
On each order scroll down to ‘Conversion summary’ then click View conversion details :
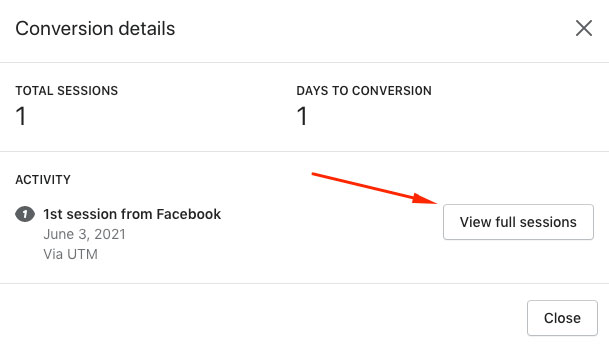
Next, you’ll click View full sessions
After that, you can see exactly which ad your purchase came from
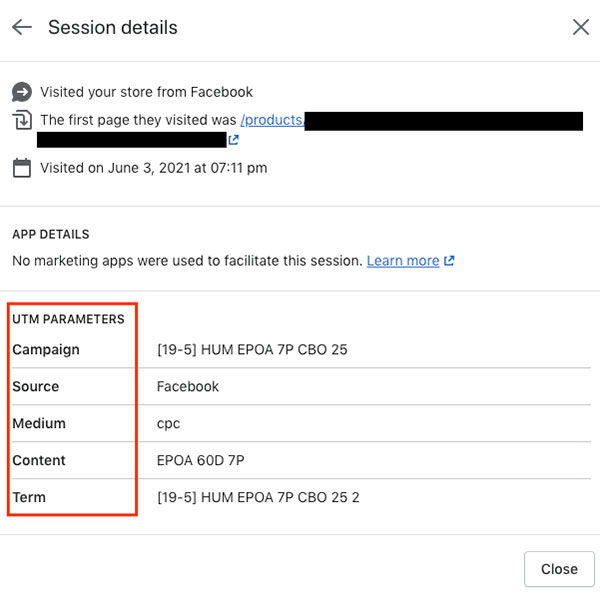
This is great data and just what you need when tracking ad performance.
Looking at the last screenshot, we can see that the purchase in question came from :
Campaign Name (Campaign) : [19-5] HUM EPOA 7P CBO 25
Adset Name (Term) : [19-5] HUM EPOA 7P CBO 25 2
Ad Name (Content) : EPOA 60D 7P
Also, the source was Facebook, and the medium cpc (cost per click).
These two last values are ‘hard wired’ into the link code I provided above, and can be changed in any way you like.
Or -Facebook has it’s own UTM URL builder if you wish to use that.
For now though, I recommend if you are just running Facebook ads, the generic code I pasted up there will do you just fine.
Once this code is in place in all your ads, you will get a way better view of overall ads performance.
Ok – Onto Shine-On Platform
If you are using the Shine-On platform pages the UTM tracking setup is a little different.
Luckily, Shine-On are on it as usual and have added a new UTM tracking feature right in their analytics dashboard.
Michael the ninja made a YouTube all about it so I suggest you watch that if you are on platform.
It seems a bit pointless me ripping off and re-packaging all his good info just for the purpose of this blogpost.
The main, important point that I will mention is that in order to get Shine-On’s UTM tracking working correctly, you need to prefix each unique parameter.
The required prefix is SO-
If this seems confusing don’t worry!
Michael explains it all clearly as usual and I strongly suggest you watch his YouTube so you can get your head round it.
He also goes over the naming convention he uses in his own Shine-On platform campaigns, which will be helpful to any of you on platform.
Summary
I cannot stress the importance of using UTM tracking in your ad campaigns.
Whether you’re using Facebook, Google, or any other platform, you need these codes in place to accurately track data!
And with Facebook, especially since the iOS 14 updates, you need UTM tracking more than ever.
Don’t run ad campaigns ‘in the dark’ – get everything tracking as clear as you can.
This way you will know whether to leave campaigns running, or kill them.
Accompanying YouTube that I made to match this blogpost, with more detail can be found by clicking here.