Etsy/Shopify Integration Part 1
For all those interested in Etsy/Shopify integration, this post will cover part 1 of integrating your Shopify store with Etsy.
Since the iOS14 updates Facebook ads have gone doo-dah for many, myself included.
Due to this, many people are jumping over to Etsy and selling Shine-On product over there.

Don’t think, however, that all this is simple and it’s easy to make big money on Etsy.
Since the iOS14 updates, so many people have jumped to Etsy and are all pushing Shine-On product.
This has resulted in an already crowded marketplace suddenly becoming super populated.
Etsy/Shopify Integration won’t be the answer to all your prayers I’m afraid…
Many Users = Harder To Sell
I think many people are looking on Etsy as some sort of saviour.
“Just move my products over here and the cash will flow in.”
Trust me, it’s not that easy.
There were already a ton of Shine-On sellers on Etsy anyway, and now there are even more.
One search on Etsy for ‘message card necklaces’ provides pages and pages of results.
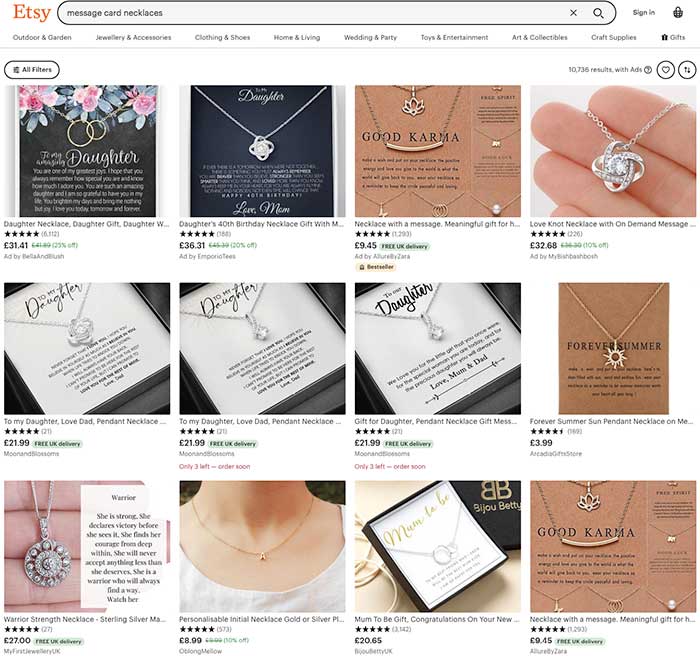
Furthermore, the top results are of sellers with thousands of sales and interactions.
How easy do you think it’s going to be, to go up against these already established guys?
Don’t Be A Buzzkill, Man.
Before I start sounding like a buzzkill and saying it’s impossible to make money on Etsy – I’m really not.
But I do want to be a realist here.
Just because someone on a Facebook group tells you that Etsy is the answer to all your prayers, bear in mind that it might not be.
Ok, that out of the way, let’s get into how we actually integrate our Shopify store with Etsy.
Note : Shine-On platform users, sorry this post may not be for you.
Not the Shopify part anyway.
If you are platform only, you can of course still list your products on Etsy and information is always useful.
But you’ll have to do your fulfilment, if and when you get any orders, manually.
Anyway, On With The Integration
First, and kind of obviously, you have to open an Etsy account in order to get going with Etsy/Shopify integration.
Next, as this ‘main’ account is just your own personal one, you then have to open a Etsy shop.
This is where you will sell your Shine-On product.
Get to this option in the menu up top :
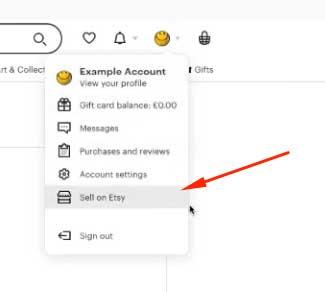
Work thru the setup choosing your shop language, country and currency.
Note : if you only want to sell in say, the US, I advise setting the shop country to United States.
All fulfilment is going to be done via Shine-On, and they are in the US. See what I mean?
Configuring Your Etsy Shop
Next, choose a name for your shop. This can always be changed later on.
During set up, Etsy will next take you to where you can ‘Add a new listing’.
Even though in my YouTube I worked thru adding a product manually, this isn’t 100% needed as we will be importing products later via an app.
So, you can skip this step if you like.
Regardless, you’ll have to add payment and billing details next.
Payment details are where Etsy will pay you money (for any sales made), while billing details are for where you will pay Etsy money.
You are charged $0.20, per 4 months, for any one item that you list on Etsy, whether you sell that item or not.
On top of that, when you make a sale on Etsy, you get charged a transaction fee of 5% of the item’s price.
Hey, I guess they have to make their money somewhere, right?
Right, Let’s Install CEDcommerce…
The next vital step in setting up your Etsy/Shopify integration.
Head on over to the Shopify app store and search ‘CEDcommerce’.
The app you want is called Etsy Marketplace Integration
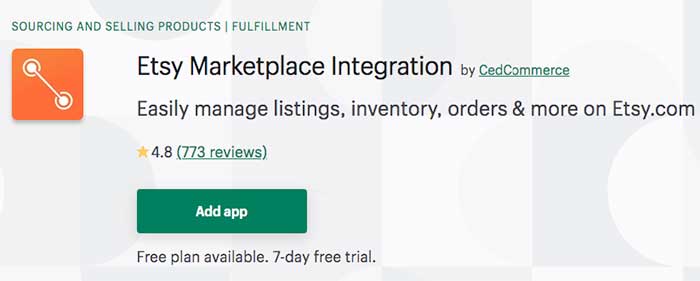
Add this app to your store, agree with the terms and conditions, and it’s off to the races.
Important : You MUST have your Etsy store set up first, or you won’t be able to connect the app to it.
Allow the app access to your Etsy store when prompted.
Now it’s time to get importing products.
Obviously you only want to import Shine-On products, and when they are added to your store they all have vendor set to ‘ShineOn Fulfilment’.
So, when importing apply the correct filter.
Choose the ‘Product vendor’ radio button, and paste ShineOn Fulfilment into the options box.
Then click ‘Start Import’.
Let the app do its thing, and if you’ve done everything right, it’ll import all your Shine-On products and give you a total of how many there are.
On the next step where you choose an Etsy category for your products, I opted to skip this step as I have various different types of products.
I’ll add the category in for each one manually later as I go over my products.
A few more options later (see my YouTube!) and we’re into the app interface.
The CEDcommerce Interface
This is what the app will look like when you first log in after importing your products :
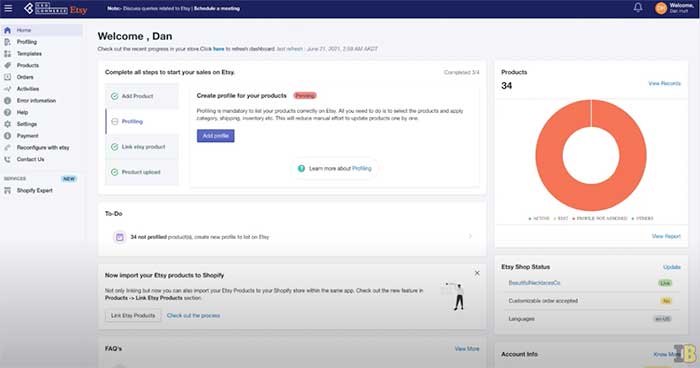
So the first thing you have to do here is create a profile.
You won’t be able to progress without doing this, so get it done 🙂
Personally I made two profiles – one for message cards, then another for heart necklaces.
These are the 2 kinds of items I sell with Shine-On, so this made sense to me.
If you do all message cards, it’ll make sense to maybe just do one profile and put everything in there.
Work through the required attribute mapping options as specified in my YouTube.
Then, you’ll have to create a shipping template as well.
This is where you specify which countries you will ship to, and the processing time.
CED won’t let you create a profile without it having a shipping template as well.
Sorry if things sound like they’re getting complicated, but there are a few hoops you have to jump through to get all this set up.
You can create your shipping template from inside where you are creating your main profile, so go ahead and do that.
If this sounds hard you can again, watch me do a full walk thru in my YouTube of this whole process.
Once you’ve set up your shipping template, give it a name and save it.
Then, also name your profile and save that too.
Congrats – you just set up your first profile!
It should look something like this :
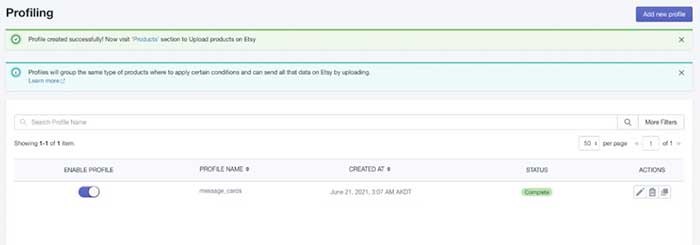
Profile Assigned (13).
Seeing as you set up a filter for your first profile, it should have pulled in the products you specified, to that profile.
In my case it was all the message card products I have on my store.
Next step is to import your products from Shopify – to Etsy.
Now CED is set up, this is pretty easy.
Check the products you want to import, go to the dropdown menu and choose option ‘Publish on Etsy’ then click the ‘Action’ button.
Give CED a minute to do its’ thing, then you’ll see the message
‘Yay! The Products have been successfully listed on Etsy!’
Hop on over to Etsy, refresh your shop listings page, and all being well you should see the product, or products, you chose to import.
This Is Where The Real Work Begins.
I’d love to say that it’s all roses now and you can just sit back, make sales and collect your cash, but this is really not the case.
There’s actually quite a lot of extra (editing) work you have to do for each individual listing.
CED is great at handling the import of your product, and orders once they start coming in.
But that asides, all it’s done is import your product listings ‘as they are’ on your Shopify store.
By this I mean your product’s title, description, images, tags, and etc.
How you list items on Shopify is very different from how you have to list them on Etsy.
As much as you might not want to hear this, you have to do some pretty heavy editing on each Etsy listing to get them to show up in searches.
If you don’t – they’ll just get lost in the mire of the thousands of other Shine-On product listings and almost never show up.
And that’s hardly what you want – right?
I told you already that Etsy/Shopify integration wasn’t a piece of cake 😉
So, setting up CED and importing your products you can class as step 1 of this whole process.
The next step – optimising your Etsy listings – will be covered in another blog post and YouTube.
Look out for that, coming soon!
Here’s the YouTube covering part 1 in case you find watching video easier :
See you guys in the next blog post.
And, in the meantime you can check all my other posts out by clicking this link.

